Category: Tutorials

  • How You Can Get More Channels To Watch On Your Multi TV

    How You Can Get More Channels To Watch On Your Multi TV

    Upon the successful setup of your multi-TV dish and decoder, if you desire to expand your channel options for an enhanced entertainment experience, there is a viable solution.

    The signals received by your decoder originate from the Astra 2B satellite, situated at coordinates 28.2E.

    It is crucial to note that multi-TV is not the exclusive broadcaster utilizing this satellite.

    Consequently, you have the opportunity to introduce additional parameters to your satellite receiver.

    This adjustment allows the detection of other signals, thereby augmenting the number of channels accessible through your multi-TV system. Let’s delve into the steps required to initiate this process.

    Getting More Channels For Your Multi TV

    To get everything started, enter the following to get you more channels. 

    Multi RV- 12525- 30000 as the symbol rate

    The above option means that you will be getting 23 TV and 3 radio stations. Also, you can rescan your multi-tv digital box to allow you to get the additional channels that you are looking for without new frequencies. Follow the steps below to do that.

    1. Press the menu button on the remote of the multi tv
    2. Choose ‘installation’
    3. Choose ‘install satellite’
    4. Press ‘ok’
    5. Now press the green button found on the remote

    The Digibox will then start rescanning automatically. After it finishes the scan, you will get more channels as well as radio stations on your multi-TV. You will see that UTV has been added to your channels.

    How To Activate Multi HD TV

    If you want to access a multi-HD TV account, you can do so by just following the steps that have been laid out below. 

    1. Dial *879#
    2. Choose 1 to get your free trial started
    3. Choose option 5 to get the account number of the HD+
    4. Type in the first 6 digits of the HD+ number that you get
    5. Press 1 to confirm the number
    6. Choose 1 to get the HD+ account activated
    7. After this, a confirmation number will be sent to you

    Upon successful activation, your Multi-TV HD account will be fully operational, allowing you to enjoy a variety of programming.

    For the installation of TV satellites, Multi-TV follows a similar principle. To ensure accurate signal reception, you need to input specific satellite tracking parameters.

    The frequency for Multi-TV is set at 12525. When positioning the multi-satellite dish during installation, it is essential to orient it facing east to optimize signal reception.

    To access additional channels, perform a Digibox scan and input the correct frequency number.

    A well-installed multi-TV setup should provide access to over 15 channels and 10 radio stations.

    Here Are Some Popular Multi TV Channels

    • Joy prime
    • Adom tv
    • Joy news
    • Rock tv
    • Sweet tv
    • OB tv
    • Pent tv
    • TVT
    • Ghana tv
    • Aseda tv
    • Cross tv
    • Tv3 Ghana
    • ZTV Ghana
    • Precious tv
    • Fire tv2

    Here Are Some Popular Radio Stations On Multi Tv

    • Joy 99.7
    • Asempa 94.7
    • Citi FM
    • Atlantis radio
    • Radio kara
    • Radio Lome
    • Kessben FM
    • Peace 104.3
    • Hitz 103.9
    • Nhyira 104.5
    • Angel 96. FM

    Conclusion

    For those seeking to expand their channel selection on Multi-TV due to the current options being less engaging, this article has provided valuable insights into the process.

    It’s crucial to ensure that the satellite dish is correctly oriented towards the east, as this is the direction from which all signals originate.

    By following the outlined steps, you can enhance your multi-TV experience with a broader array of channels.

    You can also check out other related articles such as multi-tv price in Ghana and how to reset the DStv remote.
  • How To Turn Off The Google Assistant With Your Voice Or Manually

    How To Turn Off The Google Assistant With Your Voice Or Manually

    In cinematic depictions such as the Iron Man and Avengers franchises, we witness Tony Stark’s utilization of highly intelligent artificial intelligence to seamlessly control and command his technological creations, including the iconic Iron Man suits.

    In these narratives, Stark’s AI, akin to an obedient and capable assistant, responds promptly to his verbal instructions, epitomizing a level of automation and efficiency that transcends manual input.

    While our current reality may not boast the same level of sophistication portrayed in these movies, we do possess a noteworthy counterpart: Google Assistant.

    This artificial intelligence-powered virtual assistant, analogous to Siri in iPhones, is a creation of Google designed to enhance user interactions with its products across the digital landscape.

    Google Assistant functions by responding to voice commands, enabling users to control devices and perform searches effortlessly.

    Activating it is as simple as uttering the phrase “Ok, Google,” followed by the desired command.

    This functionality significantly streamlines the usage of Android smartphones and devices, providing a hands-free and convenient experience.

    It’s worth noting that, similar to the cinematic portrayal, there can be instances where Google Assistant activates itself without explicit commands.

    While this may be perceived as an inconvenience, users have the option to deactivate it if they prefer not to utilize this feature.

    This blend of artificial intelligence and voice command technology marks a noteworthy step towards a future where our interactions with technology become increasingly intuitive and responsive.

    How To Turn Off Google Assistant

    1. On an Android device, say “Hey Google, open assistant settings” Under ‘all settings’ tap on ‘general’
    2. Turn the Google Assistant off
    3. If you cannot talk, you can use this alternative method to turn it off
    4. Open the Google app and then tap on ‘more’. This appears as three dots inside the toolbar
    5. Now tap on ‘settings and then go to the assistant section
    6. Under the ‘assistant device’ choose ‘phone’
    7. Now, switch it off by tapping on the toggle.
    8. There will be a message telling you that some features cannot work if you turn it off. Just tap on ‘turn off’ to proceed. 

    How To Make Google Assistant Recognize Your Voice

    To enable Google Assistant to recognize your voice seamlessly, follow these straightforward steps:

    1. Utter the command, “Hey Google, open assistant settings.”
    2. Within the settings menu, navigate to ‘popular settings,’ and subsequently, tap on ‘voice match.’
    3. Maintain the activation phrase “Hey Google” and proceed to select ‘voice model.’
    4. Opt for ‘retrain voice model’ to initiate the process of refining and enhancing the recognition of your unique vocal patterns.

    By diligently following these steps, you ensure that Google Assistant is finely attuned to your voice, enhancing the accuracy and effectiveness of your interactions with this artificial intelligence-powered virtual assistant.

    Conclusion


    The Google Assistant serves as a valuable tool, greatly simplifying the utilization of your smartphone. However, if you prefer a more manual approach to device management, you can easily disable it by following the steps outlined in this article. You can also check out how to change your google account’s profile picture.

  • The Right Ways To Back Up iPhone To Mac

    The Right Ways To Back Up iPhone To Mac

    In the contemporary world, our lives revolve around electronic gadgets, with smartphones being central repositories of crucial information.

    Losing a smartphone can be equivalent to losing valuable data, causing significant distress, especially for those who store sensitive information such as documents, PIN codes, and bank details on their devices.

    For Apple users, safeguarding this information involves understanding how to back up data on an iPhone.

    Apple provides three primary options for backup: iTunes, iCloud, and various third-party applications. It’s important to note that each option comes with its own set of advantages and disadvantages, but all serve the common purpose of securely preserving a backup of your information.

    Now, let’s delve into each of these backup options and explore how you can utilize them to protect your data effectively.

    Understanding the intricacies of each method empowers Apple users to make informed choices based on their preferences and needs.

    Through Simple Method

    To safeguard the data on your iPhone, you have two primary methods for creating backups: wireless backup or using a USB sync cable.

    Once you’ve made your choice between these options, you can proceed with the backup process through reputable platforms such as iTunes, iCloud, or third-party software. These methods ensure the secure storage of your valuable information.

    Back up iPhone To Mac Without A Cable (iTunes)

    The first method, which is the use of iTunes, allows you to back up your information to Mac without the use of a USB sync cable.

    This is done through the iTunes wireless functionality. Follow the simple steps below to use this feature.

    1. Go to settings
    2. Choose general and then iTunes
    3. Go to wifi sync
    4. Choose ‘mac’ from the list

    After this, you will see that there is another option ‘sync now’. Remember that your iPhone will start syncing automatically if the screen is locked while the phone has been connected to a wifi network and source of power.

    The files through the iTunes backup will be stored on your Mac computer so you should make sure that there is enough space.

    Although the iTunes option is good, it has its fair share of drawbacks. One of these drawbacks is the limitation of space.

    iCloud

    An additional alternative for your backup requirements is iCloud, which offers a substantial 2 terabytes of cloud storage.

    While this may initially appear extensive for storing photos and documents, it’s important to recognize that this space can be depleted over time.

    Notably, only 5 gigabytes are allocated to free users, necessitating payment for access to the full 2 terabytes.

    All files backed up to iCloud benefit from encryption, and restoration can be conveniently executed through wifi networks.

    The flexibility of iCloud stands out as an advantage, allowing backups from any location with wifi access.

    It’s crucial to bear in mind, however, that duplicating information already stored in a different iCloud account is not supported.

    This underscores the need for thoughtful consideration when managing your backup strategy.

    Follow the steps below to back up to iCloud 

    1. Have a connection to a wifi network
    2. Go to settings
    3. Select your name
    4. Choose ‘iCloud’
    5. Choose ‘iCloud backup’
    6. Choose ‘backup now’

    The backup process will start automatically so you should make sure that the iPhone is connected to the wifi network until the backup is done.   

    Third-Party Apps

    This process does not entail the use of a dedicated app; instead, it involves manually connecting your iPhone to your Mac and transferring files directly.

    Upon completion, you will observe the creation of a duplicate set of your files on your Mac. It’s essential to note that, unlike the iCloud or iTunes methods, this approach imposes limitations on the quantity of files you can back up.

    This manual method provides a more selective backup option, allowing you to prioritize specific files or data sets during the transfer process.

    Frequently Asked Questions

    Can I encrypt my backup files on a Mac?

    All the files that you back up to iCloud are automatically encrypted. You can also encrypt on iTunes back up although this is normally turned off by default.

    How many times can I back up my files?

    You can make a backup every day by setting your device up for that. follow these steps
    Keep iCloud backup turned on
    Have your iPhone connected to a wifi network
    Switch the screen off and connect to a power source

    How much do I need to pay for full access to iCloud storage?

    iCloud storage plan starts at $0.99 per month and that gets you 50GB   

    Conclusion

    Please keep in mind that this article does not mean that you should not seek professional advice, especially regarding the pricing of the iCloud storage plans. You can also check out how to sync contacts between iPhone and Mac.

  • How To Change The Profile Picture Of Your Google Account

    How To Change The Profile Picture Of Your Google Account

    Let us now explore the process of updating your Google account’s profile picture.

    Recognizing the prevalent demand for a clear, step-by-step guide, we have curated this article for our esteemed readers.

    Google’s profile picture holds prominence across numerous websites and platforms, including Gmail, YouTube, Google Drive, and other products under the expansive Google umbrella.

    This ubiquity stems from Google’s vast presence as a major internet conglomerate, offering users the convenience of utilizing a single Google account across multiple websites.

    The elimination of the need for separate accounts for each website streamlines the user experience.

    Consequently, any alteration made to the profile picture on your Google account resonates across all affiliated websites and platforms.

    To apply a specific image as your Google profile picture, a straightforward process awaits.

    Simply modify the picture associated with your Google profile, and the changes will seamlessly propagate across the entire spectrum of Google websites.

    In the subsequent sections of this article, we will guide you through the intricacies of changing your profile picture on your Google account, ensuring a smooth and unified online identity.

    Let us now take a look at the steps through which you can change the Google profile picture.

    How To Change The Profile Photo Of Your Google Account

    With the following steps, you will be able to change the profile on your Google account with ease. Let us take a look at the simple steps outlined below. 

    1. Go to Google. You can even open the Google search engine homepage
    2. Log into your Google account
    3. In the top right corner of the screen, you can see the profile picture there, click on it
    4. Click on the ‘camera’ icon under the profile photo
    5. In the menu that opens, click on ‘select a photo from your computer’
    6. Now browse through your photos and choose the one that you want to use. Just drag the photo into the window
    7. Crop it to your desired shape after it has been uploaded
    8. Now, click on ‘set as profile photo’

    Now, you will see that the profile photo on your Google account has been changed. This will then take effect after a few minutes on all the other Google products and websites that use your Google account for access. This will include the following:

    Conclusion

    The steps for updating your profile photo on your Google account are remarkably straightforward, requiring only a minute or two of your time.

    It’s crucial to bear in mind that when you make a change to your profile photo on your Google account, this modification extends to various Google products, websites, and applications.

    Therefore, exercise mindfulness during the process, ensuring that the selected profile photo aligns seamlessly with your desired representation across the Google ecosystem.

  • How To Sync Contacts Between iPhone And Mac

    How To Sync Contacts Between iPhone And Mac

    Have you ever considered the seamless synchronization of your contacts between your iPhone and Mac devices?

    In the contemporary Ghanaian landscape, a substantial number of individuals utilize iPhones, often complemented by Mac devices.

    A noteworthy portion of this demographic exhibits a profound affinity for Apple products, extending their allegiance to various electronic gadgets offered by the tech giant.

    Today, we will delve into the intricacies of syncing contacts between an iPhone and a Mac device.

    When contemplating the synchronization of contacts between your iPhone and Mac, there exist multiple methods to achieve this task. Let’s explore three distinct approaches to syncing your iPhone contacts with your Mac device.

    Acquiring proficiency in the process of synchronizing contacts between your iPhone smartphone and Mac device holds significant relevance for users immersed in the Apple ecosystem.

    How To Sync Contacts Between iPhone And Mac

    Here is how you can sync your contacts from iPhone to Mac using iCloud. You will first need to login into the same iCloud account for your iPhone and the Mac.

    1. Go to the settings on your iPhone and then click on your name
    2. Turn on the ‘contacts’
    3. Now, tap on ‘Merge’
    4. On your Mac device, head to the Apple menu that can be found in the top left-hand corner
    5. Change the system preference to iCloud
    6. Now switch on the toggle next to ‘contacts’

    When The Contacts Fail To Sync

     When you are syncing contacts from your iPhone to the Mac, what you should know is that you are syncing both the iPhone and the Mac with iCloud.

    So in case, you get into some trouble while trying to sync the contacts, these are the possible reasons for the trouble that you are facing.

    1. The iCloud storage full – when your iCloud storage gets full, then you will not be able to sync anything with the iCloud. The same goes for contacts as well. What you will have to do is to free up space so that you can sync the contacts
    2. Devices not logged into the same iCloud account – it could be that the iPhone and the Mac are not logged into the same iCloud account. They are probably logged into different iCloud accounts
    3. Syncing of contacts turned off – somehow, it could be that contact syncing has been turned off on one of the devices. This means that the syncing cannot go ahead. 

    Forcing The Contact Syncing, How To Go About That

    You can try forcing the contact syncing to happen through the following ways.

    1. Open the Contacts app on your iPhone
    2. scroll up the screen
    3. pull down with your finger until you see that the activity gear has started to refresh

    if this does not work, try logging out of your iCloud and then log back in again.

    1. Go to the settings on your phone, tap your name and then click on sign out
    2. Restart the phone and then log back into the iCloud
    3. Go to settings
    4. To passwords and accounts
    5. Add account
    6. Click on iCloud and sign back in

    Send Contacts To Mac Without iCloud

    You can also transfer the contact to your Mac without the use of iCloud. The only disadvantage here is that you will have to sync the contacts manually each time you update them on your phone

    Through USB Cable

    Before you do this, make sure that the iCloud contact sync has been turned off before you proceed. 

    1. Connect the iPhone to the Mac by using the USB cable
    2. Open the iTunes app on the Mac
    3. Select the iPhone icon that can be found in the top left corner
    4. Select ‘info’ on the sidebar
    5. Now check the ‘sync contacts’ box
    6. And then click on apply

    Syncing Contacts to Mac Via Airdrop

    This is another method that can be used to sync contacts between your iPhone and the Mac device. This is one of the fastest solutions you can get to use in syncing your contacts from your iPhone to your Mac device.

    1. Go to the contacts app
    2. Locate the contact you want to transfer
    3. Tap on ‘share contact’ to airdrop
    4. Choose mac
    5. Now select ‘accept’ on your mac

    Frequently Asked Questions

    Is there another way to sync contacts?

    As of now, these are the only recommended ways through which you can sync contacts with your Mac

    Will I need to update every time?

    Since the iTunes method is a manual one, you will have to update each time you save a new contact. You can do that by using the airdrop methods 

    Conclusion

    The methods for syncing contacts from your iPhone to your Mac device are straightforward and uncomplicated. The simplicity of these approaches aligns with their apparent ease of implementation.

    You might also want to check out how to save data on your phone and also how to restore backup from your MTN.

  • Think Your Whatsapp Is Being Spied On? Here Is How To Detect It

    Think Your Whatsapp Is Being Spied On? Here Is How To Detect It

    Various motivations might lead someone to attempt to hack into your phone and spy on your WhatsApp conversations.

    A technologically adept, jealous lover suspecting infidelity or a mischievous individual seeking access to sensitive chats or media are just a couple of potential scenarios.

    Despite WhatsApp’s claim of end-to-end encryption, it’s important to recognize that this doesn’t render it entirely immune to hacking attempts.

    Given WhatsApp’s status as the world’s largest messaging app, skilled hackers may concentrate their efforts on developing programs to spy on it, surpassing its encryption measures.

    While the prospect of someone spying on your WhatsApp conversations exists, there’s no need for immediate alarm.

    You can take steps to safeguard your privacy and chat with peace of mind. Notably, breaking into WhatsApp involves significant resources due to its high-level security.

    Any potential hacker must first gain access to your device to install the spying tool.

    It’s crucial to comprehend that without device access, spying on your messages is impractical unless someone physically observes your chats.

    This underscores the importance of not sharing your devices, particularly if you store private information on them.

    Refraining from lending your phone to others is a proactive measure to mitigate the risk of unauthorized access to your WhatsApp conversations.

    Signs Your Phone Has Been Hacked

    Here are some ways to detect if someone has been able to gain access to your account. People who allow other people to have access to their phones should make these checks as soon as people.

    High Temperatures 

    An abrupt increase in your device’s temperature could signal the presence of a spying tool. Many of these applications demand substantial energy resources, often resulting in elevated temperatures within the device.

    Monitoring the temperature of your device can serve as a potential indicator of unauthorized activities. If you notice an unusual and persistent rise in temperature, it’s advisable to investigate further to ensure the security of your device and the integrity of your data.

    Regularly checking for such anomalies can be a proactive measure to detect potential security threats and take appropriate actions to safeguard your privacy.

    Battery Drainage

    Monitoring your battery life can serve as another method to detect the presence of a spy app on your device.

    Spy apps often operate in the background, consuming additional resources and putting a strain on the battery.

    If you observe a sudden and significant decrease in your battery life, it could be an indication that a spyware application is actively running on your device.

    Spyware tends to utilize various functionalities, including accessing your device’s location and using data, contributing to increased energy consumption.

    Being attentive to unusual battery drainage patterns is a valuable practice in identifying potential security threats.

    If you suspect spyware, it’s advisable to investigate further and take necessary measures to secure your device and protect your privacy.

    Regularly assessing your device’s performance can contribute to the early detection of any suspicious activities.

    Data Usage

    Spyware apps can lead to faster depletion of your data than usual, as they actively use it to transmit stolen information from your WhatsApp to the hacker.

    This unauthorized data usage not only accelerates data consumption but also poses a risk of downloading third-party apps without your consent.

    If you observe a rapid depletion of your data, especially when not actively using your device, it raises suspicions of potential spyware.

    Monitoring your data usage patterns and being vigilant about unexpected data consumption can help in identifying and addressing security concerns.

    Taking prompt action to investigate and mitigate such issues is crucial to maintaining the security and privacy of your device.

    Background Noise

    Unusual noises or interference during phone calls can be indicative of potential spyware. Spyware may compromise the integrity of your calls, allowing unauthorized access to listen in on your conversations.

    If you consistently hear unexpected noises, echoes, or other disturbances during calls, it’s advisable to investigate further for the presence of spyware.

    Ensuring the security of your communication is essential, and promptly addressing any suspicious activities can help safeguard your privacy.

    Regularly monitoring call quality and being attentive to unusual sounds during conversations are proactive measures in detecting and mitigating potential security threats on your device.

    How Your WhatsApp Can Be Hacked

    Here are some of the ways through which your WhatsApp can be hacked. 

    Whatsapp Web

    Certainly, Emmanuel. The feature you are referring to is called WhatsApp Web, an extended functionality of WhatsApp that facilitates chatting on your computer.

    To enable this, you connect your computer to your phone by scanning a QR code displayed on the computer screen.

    This feature provides users with the convenience of accessing their WhatsApp conversations through a dedicated application. If you have any further questions or need clarification, feel free to ask.

    Backup File

    Once a hacker gets to access your phone, they can access your backup file by going to the file manager. They can then transfer it to their device and look at it. 

    Apps

    Some apps can be used to spy on your phone. All the person has to do is to get access to her phone and then plant the app on it.

    How To Protect Your WhatsApp And Your Device

    1. Always make sure that your phone is locked. Never type the lock code in the full glare of someone who lives with you
    2. Always make sure that you log out of WhatsApp Web on your computer
    3. Never connect to any wifi that you do not know. Always connect to the ones whose sources you know
    4. Do not install apps from just anywhere from Google. This should be taken seriously. If you do that a lot, please stop
    5. Never let anyone have access to your phone out of your sight. Always look at what they are doing and take your phone as soon as they finish
    6. Use the two-step verification on WhatsApp

    Conclusion

    It’s really important to be careful with your WhatsApp to keep it safe. The best way to stop anyone from hacking you is to not let people use your phone.

    You don’t have to be a tech expert to hack someone. They can put a spying program on your phone and give it back to you. So, it’s a good idea to never let others use your devices.

    If you want more advice or information about keeping your things safe, just ask!

     You can also check out how to know if someone has accessed your Facebook account.

  • How To Partition Your Windows 10 Hard Drive

    How To Partition Your Windows 10 Hard Drive

    Hard drive partitioning involves dividing the storage space of a computer’s hard disk into distinct sections, offering several advantages to the system owner.

    By partitioning the hard drive, users can allocate space for crucial file backups on one partition, while the other partition serves for the temporary storage of Windows files and installed programs.

    There are two primary methods for partitioning a drive. The first involves utilizing the built-in ‘Windows Disk Management Tool,’ which provides a native solution for this purpose.

    Alternatively, users can opt for third-party applications such as Easeus Partition Master, GParted, or Mini Tool Partition to perform the partitioning.

    Despite the availability of third-party tools, it is recommended to use the Windows partition tool for this task.

    Leveraging the native Windows tool ensures compatibility and stability, reducing the potential risks associated with external applications. This approach simplifies the partitioning process while maintaining system integrity.

    How To Partition Your Windows 10 Hard Drive Using Windows Tools

    Follow the steps below to partition your hard drive using the Windows tools. The steps described below can be used to partition for Windows 10, 8, and 7.

    1. Click on the file explorer on the taskbar
    2. Click on ‘this PC’ which can be found on the left navigation panel
    3. From the menu that appears, click on ‘Manage’ to open the computer management window
    4. Click on ‘Disk management
    5. Now right-click on the disk that you want to partition
    6. Choose the shrink volume from the drop-down menu
    7. Input the amount of space that you want to shrink or partition in MB 
    8. Click on ‘shrink’ and then wait as Windows creates the partition
    9. After the partition has been completed, you will be able to see the new unallocated space
    10. Right-click on the unallocated space and then choose ‘new simple velum’ from the menu that drops down.
    11. Follow the instructions until the new volume is created

    After the creation is complete, your hard drive will now have a new partition. You can use that to back up your most needed files

    Using Third-Party Apps 

    While it is possible to use third-party applications such as Easeus Partition Manager, GParted, and various others for hard drive partitioning, it is not the recommended approach.

    Despite the availability of these external tools, we advise utilizing the Windows partition manager, which is a native feature designed for this specific purpose.

    The Windows partition manager is an integrated tool created to ensure compatibility and system stability during the partitioning process.

    Although third-party apps may offer similar functionalities, relying on the native Windows tool reduces the potential risks associated with external applications.

    For optimal performance and reliability, it is recommended to leverage the features provided by the Windows operating system for hard drive partitioning.

    Benefits Of Creating A Partition

    1. Keeps your important files safe
    2. Allows for easy re-installation of Windows operating systems
    3. Can install and run multiple operating systems on the computer easily without many fuses
    4. Simple backups
    5. Improves PC security

    Conclusion

    As delineated in the article, the process of creating a partition is characterized by its simplicity, requiring a manageable level of effort.

    The inherent benefit of this procedure lies in its capacity to ensure the safety and security of your most vital files.

    By designating a specific segment of the hard drive to house essential data, you fortify the organization and protection of critical information.

    This pragmatic approach significantly contributes to the overall management and security of your digital assets. 

    Check out our recent articles:

  • All You Need To Know About The DSTV Remote, Resetting, And Programming

    All You Need To Know About The DSTV Remote, Resetting, And Programming

    It is reasonable to assume that a significant portion, approximately 60%, of the Ghanaian population possesses at least one DSTV decoder in their household.

    Consequently, these households are equipped with at least one DSTV remote control.

    In a previous article, we delved into troubleshooting common issues affecting the remote control and provided solutions.

    Building upon that, it is essential to explore additional aspects of the DSTV remote to optimize its functionality, ensuring an enhanced experience of the diverse entertainment offerings associated with owning a DSTV subscription.

    This article aims to shed light on often overlooked features and practices related to the TV remote.

    By delving into these aspects, readers can glean valuable insights to maximize their enjoyment of the extensive entertainment options provided by DSTV.

    Without further ado, let’s delve into the intricacies of the DSTV remote to empower users with a comprehensive understanding.

    Connecting Your DSTV Remote To The Decoder

    If you’ve recently acquired a DSTV decoder and managed the installation independently, you may find yourself well-versed in setting up the satellite dish but uncertain about connecting the remote. Let’s explore the process of connecting the remote to the decoder.

    The connection between the remote and the decoder involves selecting one of three options: TV1, TV2, or TV3. This choice is pivotal, especially when troubleshooting an unresponsive remote.

    To adapt the DSTV Explora remote to specific needs, it’s crucial to understand how to switch between TV1, TV2, or TV3 settings.

    This flexibility allows users to configure the remote according to the specific requirements of the moment.

    Whether it’s TV1, TV2, or TV3, the ability to adjust the remote settings ensures seamless functionality and addresses any issues related to unresponsiveness.

    Let’s delve into the steps to make this essential configuration for an optimal user experience.

    How To Set The Remote

    If you do not know how to set the remote under either of the above-mentioned TV settings, here is how to go about it.

    All you have to do is to press and hold the needed button for about three seconds until you see the green light blinking on the designated TV. For example, on TV1. 

    If you happen to see that the green light is blinking below the ‘Back’ button, then it means that the remote is set to TV2 mode.

    Pressing and holding the ‘Back’ button for three seconds. The green light will then blink on TV2.

    If you wish to set the remote to work under TV3, the procedure is quite simple as well but requires a bit more than the earlier ones.

    You will have to press and hold the ‘back’ button and the ‘I’ button together for three seconds. 

    DSTV Troubleshooting Colors For Remote

    These are the various colors for troubleshooting the remote of the DSTV decoder. Here are the various colors. 

    • Mode 1, TV2- red
    • Mode 2, TV2- green

    Setting Up The DSTV A7 Remote

    The programmable nature of the DSTV remote enhances its usability with the decoder, allowing users to effortlessly switch the remote between different decoders.

    However, there are instances where errors during the setting process can result in the remote functioning incorrectly, akin to a broken remote.

    In such cases, it becomes necessary to reset the remote to its default settings, undoing any inadvertent changes made during the programming process. Resetting the programming on the A7 remote serves as an effective solution, systematically clearing out any errors and restoring the remote to its initial, default configuration.

    This simple yet crucial step ensures the smooth and error-free operation of the DSTV remote, contributing to a hassle-free and enjoyable viewing experience.

    Let’s explore the steps involved in resetting the programming on the A7 remote for optimal functionality.

    How To Reset The DSTV Remote

    Since you now know that you need to reset the DSTV remote before you can correct the mistakes that have accumulated on it, you will have to do exactly that.

    Let us look at the ways through which you can reset the remote.

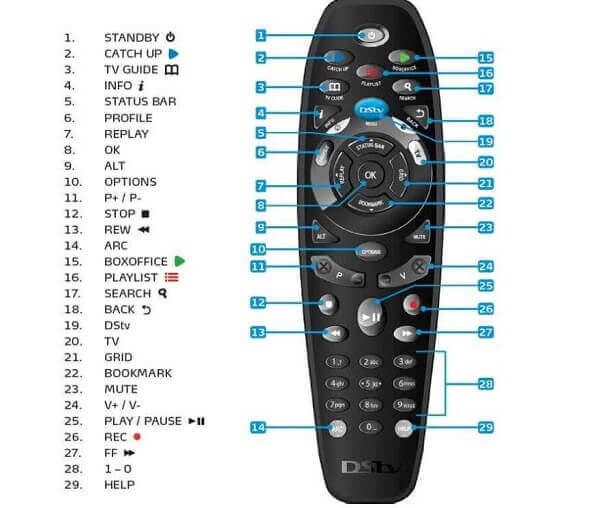
    1. Hold down the ARC and the standby button together for about three seconds. The remote will change to an amber color while you are doing this
    2. While you are still pressing the ARC button, release the standby button
    3. Now dial in 9499 while you are still pressing the ARC button. There will be three green blinks of the light
    4. Now, just release the ARC button and the process will be complete

    Setting Up DSTV Link 

    Here is how to set up the link between your remote and the TV.

    1. Press on the menu button
    2. Choose advanced options
    3. Enter the PIN as 9499
    4. Now, select equipment setup
    5. Choose TV link/ auxiliary in option 3
    6. Select ‘on’
    7. Now save the option you just chose
    8. And the press ‘ok’ to finish

    Conclusion

    With the provided insights, configuring your DSTV remote becomes a straightforward task that you can accomplish independently.

    By understanding the process of connecting the remote to the decoder, switching between TV settings, and resetting the remote when necessary, you empower yourself to manage these tasks without the need for expert assistance.

    This self-reliance ensures that you can enjoy your DSTV experience with confidence, knowing that you have the know-how to troubleshoot and optimize the functionality of your remote.

    Should you encounter any challenges along the way, these guidelines serve as a reliable resource to navigate and resolve potential issues. Happy viewing!

  • Guide To Removing Annoying Ads On Infinix Note 12

    Guide To Removing Annoying Ads On Infinix Note 12

    The budget-friendly Infinix Note 12 offers great hardware specs and features for the price. However, users often experience annoying popups, banners, and video ads displaying frequently on this Android device.

    These distracting ads can appear in apps, notifications, and when unlocking your phone. Read this guide to learn how to effectively disable ads on the Infinix Note 12 for a smoother user experience.

    Why Ads Display on the Infinix Note 12 Infinix pre-installs various apps on their Note 12 phone targeting the African market.

    Some of these apps monetize by displaying intrusive ads to users. Popup and full-screen video ads may appear randomly, even on the lock screen.

    While frustrating, the ads allow Infinix to subsidize costs and offer the phone relatively cheaper.

    However, there are ways to block ads on the Note 12 through settings adjustments and downloading additional ad-blocking tools.

    How to Turn Off Notifications Access for Ad-Supported Apps

    Many unnecessary ads on the Note 12 come from certain pre-installed apps having permission to display notification ads. You can disable this by turning off Notifications access for those apps:

    1. Go to Settings > Apps & Notifications
    2. Tap Special App Access
    3. Select Notification Access
    4. Identify any apps serving intrusive ads like “Smart Info”, “Phone Master” etc.
    5. Tap the toggle switch next to those apps to turn off Notification Access
    6. Toggle off Accessibility Services for those apps too

    Doing this prevents ads packaged as notifications by those apps. However, it doesn’t block all ad types.

    Using Ad Blocker Browsers on Infinix Note 12

    Specialized ad-blocking mobile browsers can remove many in-app and website ads:

    1. Install an ad-blocking browser like Blocka or Brave from the Play Store
    2. Set it as your default browser in Settings > Apps > Default Apps
    3. Use the ad-blocking browser instead of Chrome for web browsing

    This removes ads from websites and also in other apps utilizing the browser. But other ad formats still need addressing.

    Disabling Personalized Ads In Google Apps

    Google serves personalized ads in apps like YouTube based on your usage and interests. Switch this off by:

    1. Open the Google Settings app
    2. Go to Ads
    3. Turn off Personalized Ads

    This prevents Google from targeting you with relevant ads. Toggle off Ad Personalization in app permissions too.

    Using A System-wide Ad Blocker App

    Dedicated ad blocker apps apply at the network level to block ads across all apps and websites:

    1. Download a system-wide blocker like AdBlock Plus or Blokada
    2. Ensure the VPN and other permissions are enabled
    3. Customize the app filters to block various ad formats
    4. Monitor blocked ad numbers and whitelist acceptable ads

    This provides site and app-wide ad blocking without adjustments per app. Configure the ad blocker based on your preferences.

    Disabling Flashy Animations And Transitions

    Some flashy elements like animated transitions and popups contribute to the ad-like clutter on the screen. Reduce distractions by:

    1. Go to Settings > Display
    2. Scroll down and toggle off all animation and transition effects

    This provides a cleaner and more subdued interface when navigating and switching apps. Disable video previews and auto-play in apps too.

    Adjusting Infinix Note 12 Ad Settings

    Dive into the Note 12’s Ad settings to manually disable targeted ad types:

    1. Open Settings and search for Advertising
    2. Toggle off Receive Recommendations, Interest-based ads, etc.
    3. Disable Personalized ad profiles and reset your ID
    4. Review app ad permissions and turn them off as needed

    Adjust any other ad-related preferences for reduced sponsored content.

    Conclusion

    While ads allow the Infinix Note 12 to be affordable, there are many ways to effectively minimize intrusive ads from constantly displaying.

    Adjust notification settings, use ad-blocking browsers, disable Google personalized ads, get a system-wide ad blocker, and simplify animations for fewer distractions.

    With a few tweaks, you can enjoy smoother ad-free usage from your Infinix Note 12.

  • How To Save More Data On Your Phone

    How To Save More Data On Your Phone

    Have you ever thought about how much data you use and how it can cost a lot of money? When you use a lot of data, you often end up spending more money to get more.

    To save your money, it’s a good idea to use less data. Using less data means you won’t have to spend as much money on it. These two things are connected, but many people haven’t realized it yet.

    I’m here to help you understand how to use less data without needing any extra apps. You don’t have to worry about downloading anything with your data. Let’s see how we can do that.

    Limit How Often You Use Social Media

    To effectively manage your data consumption, consider reducing your frequency of visiting social media platforms.

    Notably, applications such as Instagram and Snapchat are known to consume substantial amounts of data, akin to a high-performance vehicle expending fuel.

    These platforms continuously load content as long as you remain active, retaining user data throughout your presence on the site.

    The Facebook application is also a notable consumer of data, particularly when engaging with video content, resembling a streaming process.

    For a more data-efficient experience, you may opt for a budget-friendly browser like UC Mini to access Facebook.

    While this may not provide the same level of sophistication as premium browsers, it allows for data conservation.

    It is advisable to use version 9 of UC Mini, as newer iterations may deviate from the essence of a ‘budget browser.’

    Data Compression In Google Chrome

    Given Google Chrome’s status as one of the premier web browsers, it is fitting to explore ways to optimize data usage within its framework.

    In the mobile iteration of the browser, a built-in feature known as data compression proves instrumental in data conservation.

    Activation of this feature results in the rerouting of traffic through a Google proxy. Effectively, this process entails the reduction of data size before reaching your device, thereby ensuring a more economical data utilization during your browsing sessions.

    Enabling data compression in Google Chrome is a prudent step to minimize data consumption while maintaining an efficient browsing experience.

    How To Turn It On

    1. Go to the Google Chrome browser
    2. Tap the 3-dot located at the 
    3. Click on settings and then go down to ‘data saver’     
    4. You can then switch the feature on or off

    Whatsapp Calls

    There is a feature in WhatsApp that few people know about. This allows you to save data while you are making calls. To access this feature

    1. Go to settings
    2. Data usage
    3. Check on ‘low data usage’

    If your calls lose quality after turning this off, you can put it back on. 

    Whatsapp Status

    Addressing data consumption within messaging apps, particularly WhatsApp, is crucial for efficient usage.

    WhatsApp status, akin to a streaming service, significantly utilizes data, especially when viewing videos not stored on your device.

    To manage this, consider adjusting your viewing habits by limiting the frequency of watching statuses, and prioritizing image viewing over videos.

    Additionally, disable the auto-download feature for media to exercise greater control over your data usage.

    When this feature is active, incoming media is automatically downloaded to your device. Disabling it ensures that you have the opportunity to approve or reject downloads, preventing unnecessary data expenditure on content that may not align with your preferences.

    By adopting these measures, you can exercise better control over your data usage on WhatsApp and mitigate the impact of data-intensive content.

    To switch this off,

    1. Go to settings
    2. Data usage
    3. Uncheck ‘auto-download media’  

    These tips can save you from wasting data, thereby saving you a lot of money in the process.

    You might also want to check out our recent guide articles covering how to partition your Windows 10 hard disk.